Showing posts with label Chocolate. Show all posts

Sunday, October 14, 2012

Chocolate Chip Scones


Ingredients

  • 2 cups all-purpose flour
  • 3 tablespoons sugar
  • 1 tablespoon baking powder
  • 1/4 teaspoon salt
  • 5 tablespoons butter
  • 1 cup heavy cream
  • 1 cup semi-sweet chocolate chips
Directions
  1. Preheat oven to 450. Line a baking sheet with a silicone baking mat or parchment paper.
  2. In a large mixing bowl, whisk the flour, sugar, baking powder, and salt.
  3. Cut butter into 1/4" cubes and toss in the flour. Then cut with a pastry cutter until the mixture resembles fine crumbs.
  4. Add cream and stir with a spatula just until it starts to come together (we are going for somewhere between pie crust and biscuit here).
  5. Turn the dough out onto a floured surface and ball it up gently with your hands. Don't over-knead, just sort of squeeze until it all sticks together.
  6. Flatten the dough out into a rectangle, about 8x10x3/4". Using a bench scraper, slice into 8 squares (or triangles if you prefer.
  7. Transfer the scones to the baking sheet and bake 12-15 minutes until they are lightly golden brown on top.

Monday, October 1, 2012

Homemade Chocolate Ice Cream Shell Topping

Wow. This is easy. And yummy. 2 ingredients! We were out of Magic Shell for our ice cream tonight, and the kids said please really nicely. We've had a jar of coconut oil in the pantry for a while (hint: it also makes amazing homemade lip balm), so I made homemade chocolate shell topping. It took less than 5 minutes, folks.

While we ate our dessert, the kids provided lots of suggestions for alternative varieties. Lets see, in the pantry we have peanut butter chips, butterscotch chips, peppermint chips, white chocolate chips...


Ingredients
  • 1 cup chocolate chips
  • 2 Tbsp coconut oil

Directions
  1. Microwave chocolate chips on 50% power in 30 second increments until melted.
  2. Stir in coconut oil (it starts solid but will melt immediately upon hitting the warm chocolate).
  3. Spoon over ice cream and enjoy.


Tuesday, December 20, 2011

Christmas Cake Pops


Ingredients
  • 1 box cake mix, plus the ingredients to make it.
  • 1 can frosting
  • 2 14-ounce bags Wilton Candy Melts
  • popsicle sticks
  • candy sprinkles
(I used a chocolate cake mix and chocolate frosting, but any cake mix or recipe and frosting comination that you like would be delicious!)

Directions
  1. Mix and bake the cake according to the package directions. The pan shape doesn't matter. Cool the cake completely.
  2. Break the cake into chunks and place in the bowl of a stand mixer. Blend on slow until the cake is completely crumbs. Add icing. Mix until the mixutre is uniform and has the consistency of a cookie dough. Note, you may need to do this in halves if your cake won't fit in your mixer bowl.
  3. Refridgerate the cake dough for 30 minutes or so to make it easier to handle.
  4. Line a cookie sheet with a silicone baking mat or with waxed paper. 
  5. Scoop the cake mixture by heaping tablespoons and form into small balls, about 1-2 inches in diameter. Roll with your hands to make smooth balls. Place them on the cookie sheet.
  6. Refridgerate or freeze the cake balls at least 30 minutes.
  7. Melt a small amount of candy melts (about 1/2 cup) in the microwave until smooth and creamy. I use 30-45 second intervals on 50% power, stirring in between. A double boiler might go faster, or maybe not.
  8. Dip the end of each popsicle stick into the melted chocolate and then insert into the cake ball, pressing all the way through to the cookie sheet.
  9. Refridgerate or freeze the cake-balls-on-stick for 30 minutes or until the chocolate is firm and the sticks are stuck.
  10. Melt the remaining candy melts according to the directions. You might want to do this in two-to-four batches. I used two different colors, and did each color in two halves.  30 second intervals at 50% power until the chocolate is smooth and runny.
  11. Dip the cake end of each stick into the chocolate, evenly coating the cake center. Use a spoon and/or spatula to help ensure even coverage, and twirl slowly and/or tap to remove any big drops.
  12. While the chocolate is still wet, shake sprinkles on the pops.
  13. Place the pops, stick-side down, in a block of styrofoam that you have covered with plastic wrap, to dry. A stiff cardboard box with small holes punched in it works also.

Sunday, August 7, 2011

Triple-Chocolate Chip Cookies

True story: I shared a bite of this cookie dough with my 4-year old son and he spit it out. I have no idea whose genetics this problem comes from, because raw cookie dough is one of the exceedingly few sweet-related food weaknesses my husband has (and we all know that I have a sweet tooth the size of Antarctica). And lest you all think I'm forcing salmonella upon my children, I do use pasteurized eggs.

Anyway, there recipe:

Ingredients
  • 1 cup plus 2 tablespoons all-purpose flour
  • 1/2 tsp baking soda
  • 1/2 tsp salt
  • 2 ounces dark chocolate, grated
  • 1/2 cup (1 stick) softened butter
  • 1/2 cup packed brown sugar
  • 1/3 cup granulated sugar
  • 1/2 tsp vanilla extract
  • 1 egg
  • 3 ounces semi-sweet chocolate chips
  • 1 1.5 ouce milk chocolate bar, broken roughly into about 1/4 inch chunks

Directions
  1. Preheat oven to 375.
  2. In a medium mixing bowl, whisk flour, baking soda, salt, and grated chocolate and set aside.
  3. With a mixer, cream the butter and two sugars until light and fluffy. Add the egg and mix until combined.
  4. Carefully add the dry ingredients to the butter/sugar mixture and mix until combined.
  5. Stir in the chocolate chips and chunks.
  6. Scoop by 1-inch balls onto a cookie sheet. 
  7. Bake 9-12 minutes. Let them cool on the cookie sheet about two minutes before transferring to a cooling rack.
  8. Good luck fending off the wild hoards of chocolate lovers while they cool. Or, just serve warm :)

Saturday, August 6, 2011

.@FoodNetwork 's Chocolate-Chocolate Chip Muffins

The kids wanted muffins this morning, but we are preparing to move houses and I have packed my cookbooks. And muffin pans. Luckily for the kids, we have the internet and a set of silicone muffin cups.

This recipe is from FoodNetwork and their copy (with the ability to print nicely) can be found here.

Ingredients
  • 1 1/4 cups all-purpose flour
  • 1/2 cup unsweetened cocoa powder
  • 1/2 teaspoon baking powder
  • 1/2 teaspoon baking soda
  • 1/2 teaspoon fine salt
  • 2 large eggs
  • 4 tablespoons unsalted butter, melted
  • 1/2 cup dark brown sugar
  • 3/4 cup milk
  • 1 tablespoon vegetable oil
  • 2 teaspoons pure vanilla extract
  • 1 cup semisweet chocolate chips

Directions
  1. Preheat the oven to 350 degrees F.
  2. Set the silicone muffin cups on a cookie sheet and spray the inside of each with cooking spray.
  3. Whisk the flour, cocoa, baking powder, baking soda and salt in a medium bowl. In another medium bowl, lightly whisk the eggs, then whisk in the butter, brown sugar, milk, oil and vanilla.
  4. Quickly fold the wet ingredients into the dry with a rubber spatula. Just before the batter comes together, fold in the chocolate chips—don’t mix the batter too much or the muffins will be tough. Divide the batter among the muffin cups (1/4 cup of batter per muffin). Bake until a tester inserted in the center comes out clean, about 25 minutes. Turn the muffins out of the tins, cool on a rack. Serve slightly warm with jam.

Saturday, July 16, 2011

Accidentally Low-Sugar Chocolate Pecan Banana Bread

My Year of Pancakes hit a mid-year slump. We are probably moving houses, possibly as soon as next month. The new place has a big fancy kitchen in which to make lots of big fancy pancakes (and other yummies). I'm excited. I'm also busy packing and cleaning and painting and did I mention packing and cleaning?

Yeah, cookbooks are packed. Many of my baking pans are packed. Not that you'd know it by looking at my cupboards. Ahem, not that I have a lot of baking pans or anything (Hey, I like to cook so back off, k?) :) News flash: moving is hard work. Exponentially harder with children than it was when my husband and I last did it as newly-engaged twenty-somethings.

This morning, we all are in need of tasty, easy, comfort food to help soothe frazzled nerves. So, banana bread. Banana bread with pecans. Banana bread with chocolate chips and pecans. Easy peasy and it make the house smell so good.

The silly part about this recipe is that I forgot the sugar. Normally, I would have added 3/4 cup of sugar along with the bananas, and you still can if you prefer. But with all of the banana and the extra chocolate, it is still kid-tested and approved.

Chocolate Pecan Banana Bread
Ingredients
  • 1 1/2 cups all-purpose flour
  • 1 1/2 teaspoons baking powder
  • 1/4 teaspon baking soda
  • 1/4 teaspoon ground cinnamon (I like Penzey's Ceylon cinnamon in banana bread)
  • 1 egg
  • 1 cup mashed bananas (3 super-over-ripe bananas)
  • 1/4 cup melted butter
  • 1/2 cup chopped pecans
  • 1/2 cup semi-sweet chocolate chips
Directions
  1. Pre-heat oven to 350. Spray a loaf pan with cooking spray.
  2. In a medium mixing bowl, mash bananas. This is a small-child-friendly-task--just provide a potato masher and get ready for the giggles.
  3. In a large mixing bowl, whik flour, baking powder, baking soda and cinnamon.
  4. Once you manage to extract the banana mash from the hands of your tiny sous chef, whisk in the egg and butter. Note, this is the point of the recipe where you could add sugar, if you're not distracted by curious kittens and children and your lack of morning coffee.
  5. Stir the banana mixture into the dry mixture with a spatula just until combined.
  6. Fold in the chocolate chips and pecans.
  7. Scrape the batter into the prepared pan and bake about 45-55 minutes. 
  8. Let the bread cool in the pan about 10 minutes before removing.  Serve hot if you're impatient, or cool on a wire rack if you can wait that long.

Thursday, June 9, 2011

Two Way Cocoa Oatmeal M&M Cookies

Many drop cookie recipes can easily be made into bar cookie recipes just by baking them in a cake pan instead of on a cookie sheet.

These are a sweet take on oatmeal cookies, with peanut M&M's for sweetness, crunch, and just a touch of protein. The cocoa flavor is good but not overpowering. I won't go so far as to say they're healthy, but the oatmeal makes me feel better about serving these after school :)

Ingredients
  • 1 1/2 cups all-purpose flour
  • 1/4 cup cocoa powder
  • 1/2 teaspoon baking powder
  • 1/2 teaspoon salt
  • 1 cup (2 sticks) butter, softened
  • 1 cup packed brown sugar
  • 1 cup sugar
  • 2 eggs
  • 3 cups quick-cooking oats
  • 2 cups peanut M&M's (about 2/3 of a bag)
Directions
  1. Preheat oven to 325. If you are making bar cookies, grease a large cake pan. If making drop cookies, line two cookies sheets with parchment or silicone liners. (I did both, so I greased a 8" square baking pan and lined a cookie sheet).
  2. Whisk flour, cocoa powder, baking powder, and salt in a bowl.
  3. Fit your stand mixer with a silicone-edged beater and blend butter and sugars. Add eggs one at a time, beating about 30 seconds on medium in between.
  4. Slowly add the flour mixture and beat until well combined. Add the oats in several batches. If you don't have a nifty SideSwipe beater, remember to turn off the mixer and scrape down your bowl every now and then.
  5. Add the M&M's last and beat just until they are distributed (without the nifty beater, I suggest doing this by hand with a stiff spoon).
  6. Spread dough evenly in the greased pan, or drop by generous (palm-sized) balls onto a cookie sheet.
  7. Bake individual cookies about 22 minutes. Bars will take about 5-8 minutes longer.

Sunday, May 29, 2011

Semi-homemade Black Forest Cake

Ingredients
  • 1 chocolate cake mix (plus ingredients as specified on the box)
  • 1 can cherry pie filling
  • 2 cups heavy whipping cream
  • 4 tablespoons powdered sugar
  • 1 tablespoon triple sec*
  • Fresh cherries
  • 4 ounces dark chocolate (e.g. Hershey's Special Dark), grated. (Grate with a food processor or a box grater and chill until ready to use).
Directions
  1. Prepare cake according to package directions in two 9" round cake pans. Remove from the pan and cool completely on a wire rack
  2. For the whipped cream icing:
    1. In a cold bowl, begin whipping cream with an electric mixer.
    2. Add sugar and triple sec.
    3. Continue whipping until the cream is firm. Keep chilled until ready to use.
  3. Place one cake layer on the serving plate or a cardboard cake circle. If you are assembling directly on your serving plate, I suggest sliding strips of foil or waxed paper under all the edges to catch drips and keep your plate clean.
  4. Spread with a thin layer of cherry pie filling. Spread a thin layer of whipped cream over the filling.
  5. Top with the second cake layer.
  6. Ice top and sides with the remaining whipped cream.
  7. With cold hands carefully press grated chocolate around the outside edges of the cake. This is a messy process. And warm hands melt the chocolate shavings. Trust me.
  8. Decorate the top with washed, pitted, fresh cherries.
  9. Keep the cake refridgerated until ready to eat.

Saturday, May 28, 2011

Baked Chocolate Donuts with Chocolate Ganache Glaze

There are some dishes I seem to make a lot. It is especially true of the ones requested by my children, and my son is a huge chocolate donut lover. Wait, he is a small person who hugely loves chocolate donuts. Oh, well, you know what I mean. I have made Baked Chocolate Donuts before. And I will do it again. Differently every time, apparently.

In today's version I used oatmeal in the batter and melted butter instead of oil. The butter adds a nice softness and the oatmeal adds a little extra fiber, so I can pretend that I made a healthy breakfast for my kids. We won't discuss the health benefits of the chocolate ganache glaze.

To make these, you will need a donut pan. And a chocoholic to help you finish them off.

Ingredients
  • 1 1/3 cups all purpose flour
  • 3/4 cup quick-cooking oats
  • 1/3 cup Hersheys Special Dark cocoa powder
  • 1/3 cup sugar
  • 2 teaspoons baking powder
  • 1/4 teaspoon salt
  • 1 lightly beaten egg
  • 3/4 cup skim milk
  • 1 tsp vanilla extract
  • 1/4 cup (1/2 stick) butter, melted and cooled
  • For the Glaze:
    • 1/2 cup heavy cream
    • 3 ounces bittersweet chocolate
    • 1/2 tsp vanilla extract
Directions
  1. Pour milk over oats and set aside to soak.
  2. Preheat oven to 400. Spray a donut pan with cooking spray.
  3. In a large mixing bowl, whisk the flour, cocoa powder, sugar, baking powder, and salt together.
  4. Stir the melted butter into the oatmeal-milk mixture. Add egg and vanilla. Stir to combine.
  5. Add the wet ingredients to the dry and blend well. This mixture is halfway between cookie dough and muffin batter. It will be heavy.
  6. Pour (or shape) the dough into the muffin pan. Bake about 12 minutes or until a toothpick inserted into a donut comes out clean.
  7. For the glaze:
    1. Break or chop the chocolate into pieces (unless you are already using chocolate chips).
    2. Heat the cream in the microwave about 40 seconds until hot.
    3. Pour hot cream over room temperature chocolate. Add vanilla.
    4. Stir until the chocolate is well blended and glossy. It should resemble a loose chocolate pudding.
  8. Set a cooling rack over a silicone baking mat (or foil) to catch the chocolate drips. Or skip this step and plan to wash your counter.
  9. Cool the donuts in the pan about 2-3 minutes then turn out onto the cooling rack.
  10. Carefully (so as to not burn yourself) dip the tops of each donut in the chocolate glaze and set on the rack to cool.

Saturday, May 7, 2011

Chocolate-filled Ebleskiver

Ebleskiver is a fancy word for a small round pancake puff. It is made in a pan that has small half-round indentations, like this one at Amazon.com:

(I found mine at Target for around $20).

Ebleskiver are easy to make and you can add a variety of fillings to them.  So far, my daughter prefers apple butter and my son prefers chocolate.  I may try small bits of cooked sausage next.

For the bread-part, use your favorite pancake batter (like my fluffy pancakes or maybe my triple chocolate pancakes or heck, even a boxed mix if you're in a hurry).

Preheat the pan over about medium heat until water sizzles and evaporates immediately. Whatever setting you'd use for pancakes. On my stove that's half a tick hotter than the middle (5.5).

These seem to cook best with butter, so I cut up butter into teeny-tiny cubes about 1/4" square. Drop one butter cube into each well on the pan. They should sizzle and foam immediately.  Then pour pancake batter into each well so that it's about 3/4 full.  Immediately follow with about a teaspoon of your filling. Hot fudge sauce, jelly or jam. Even blueberries (I'd suggest thawed ones, not frozen, since they won't have much time to cook).

Cook about 1or 2 minutes on the first side. Then comes the tricky part. To flip them you need two plastic spoons or the handle-end of a pair of rubber spatula or maybe a pair of chopsticks. Carefully flip them over and cook on the second side for another 1-2 minutes or so.

You can serve these with maple syrup like pancakes, or sprinkle with powdered sugar like I did with the chocolate batch above.

Thursday, April 14, 2011

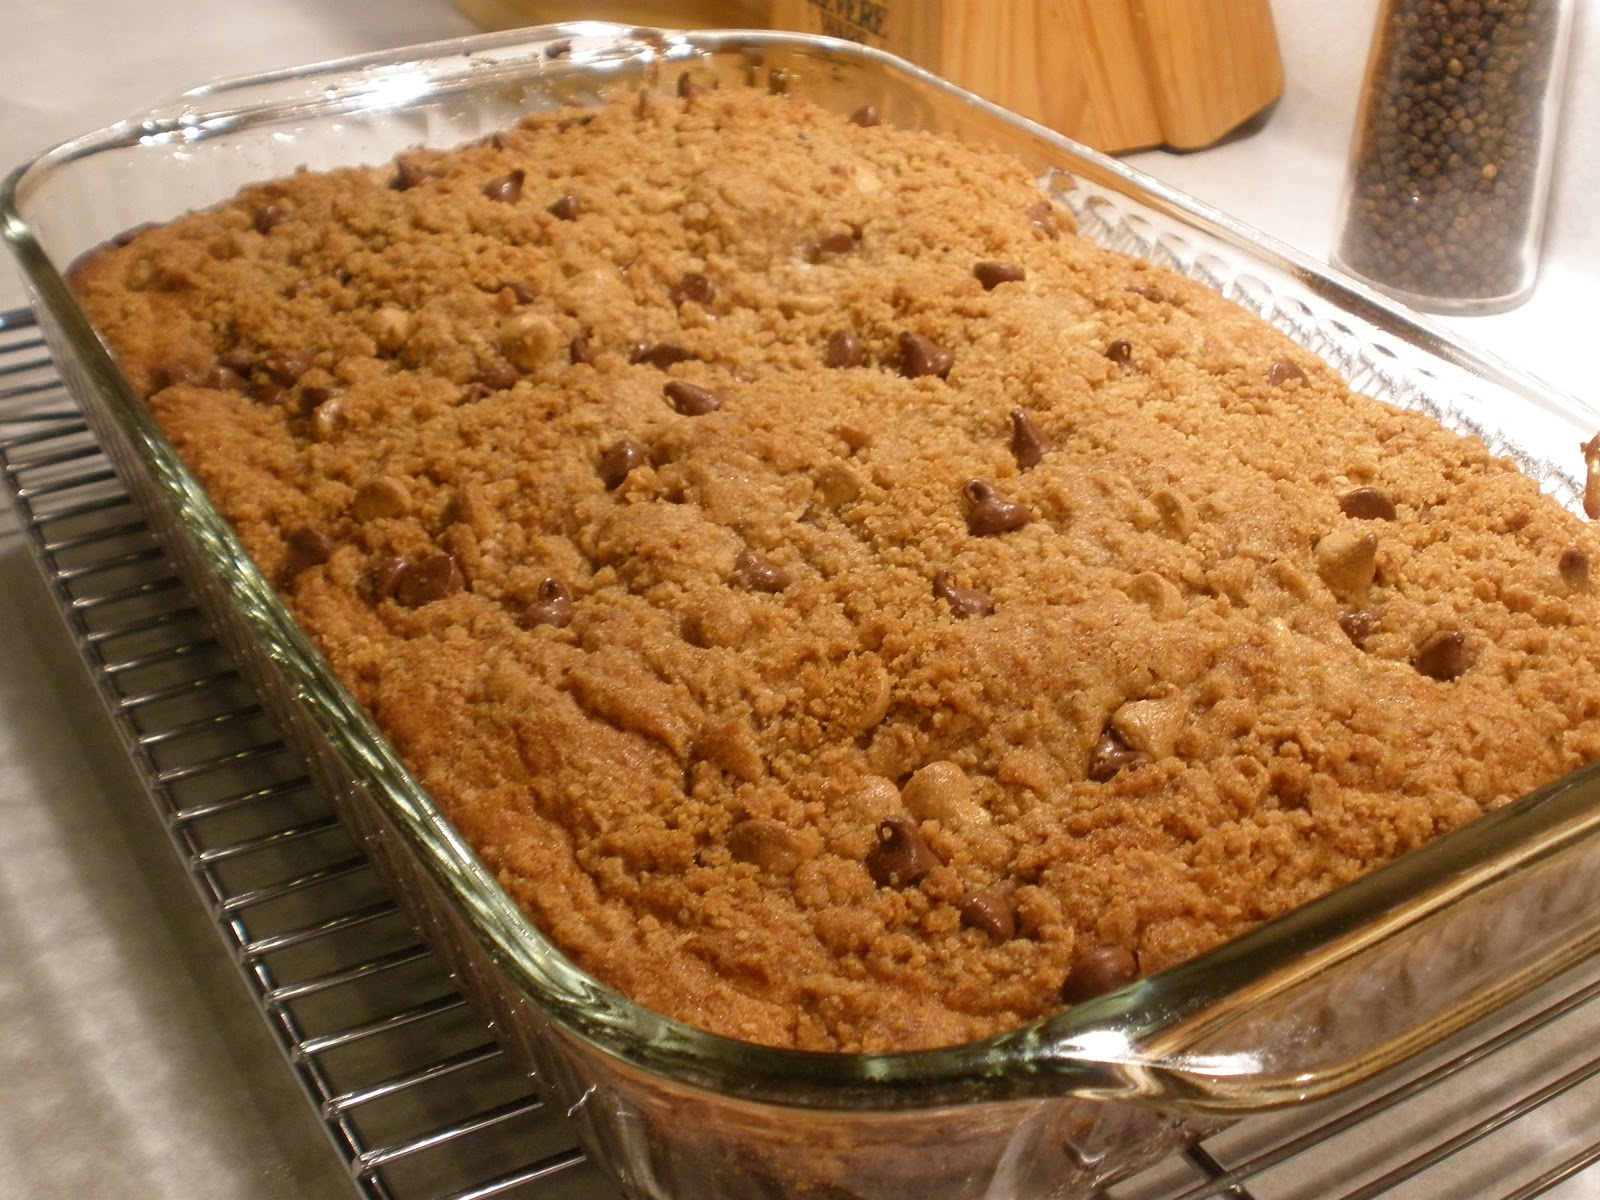
Peanut Butter Chocolate Chip Cake with Peanut Butter Struesel Topping

I'm only cheating a little. I swear. But it was my turn to bring a birthday treat to work for the April birthdays, and none of the other treat-bringers were planning a chocolate dish, and what is a birthday celebration without chocolate?

It was mostly peanut butter. Mostly. Lent will be over soon. And I have given myself dispensation to have chocolate for other birthday celebrations...


Topping Ingredients
  • 1/2 cup all-purpose flour
  • 1/2 cup packed brown sugar
  • 1/4 cup creamy peanut butter
  • 3 tablespoons butter, chilled
  • 1/4 cup chocolate and/or peanut butter chips (I had some of both on hand, so I used some of both)
Cake Ingredients
  • 2 cups all-purpose flour
  • 1 cup packed brown sugar
  • 2 teaspoons baking powder
  • 1/2 teaspoon baking soda
  • 1/4 teaspoon salt
  • 1 cup milk
  • 1/2 cup creamy peanut butter
  • 2 eggs
  • 1/4 cup butter, softened
  • 1/2 cup chocolate and/or peanut butter chips

Directions
  1. Preheat oven to 375. Spray a 9x13 baking pan with cooking spray.
  2. For the topping:
    1. In a small mixing bowl, stir the flour and the brown sugar.
    2. Using a pastry blender, cut in the peanut butter and butter until the mixture resembles coarse crumbs.
    3. Stir in about half of the chocolate & peanutbutter chips. Set the topping aside.
  3. For the cake:
    1. In a large mixing bowl (I used my stand mixer), stir the flour, brown sugar, baking powder, baking soda, and salt.
    2. Add the softened butter and peanut butter and blend.
    3. Alternate the eggs and the milk until the mixture is blended. Don't forget to scrape down the bowl if you don't have a fancy silicone paddle attachment.
    4. Beat the cake batter on medium speed about 3 minutes. Stir in the remaining chocolate and peanut butter chips.
  4. Spread the batter evenly in the greased ban and sprinkle the topping on top.
  5. Bake about 30 minutes until a toothpick inserted in the middle comes out clean.

Sunday, March 27, 2011

Thomas the Train Cake

This is the last cake of our family Cake Week (the week of my birthday, my son's birthday, and my mother's birthday, plus up to two weekends on either side, wherein I tend to bake a LOT of cakes). Today we had a small kids birthday party for my son.  He requested a Thomas the Train cake.

I admit that I'm not the best cake decorator and I have a silly problem of preferring taste over appearance when it comes to food. These little train cupcakes might work really well with rolled fondant, but I'm not a fan of how the packaged stuff tastes (maybe someday I'll try making my own). I used a basic decorating frosting (shortening, butter, vanilla, powdered sugar).The dark brown frosting is chocolate leftover from the cupcakes I sent to preschool on his actual birthday.


This is actually the second Thomas cake I've made for him with this cake pan. I bought the a few years ago at a local small kitchen store. I think this is the same one on Amazon. There are other, Thomas-branded cake pans available too. Maybe next Christmas I will try using this pan with a gingerbread recipe and decorating the cars with candy...

If you don't over-fill the train cars, each one holds about one to one-and-a-half cupcakes worth of batter.  I, of course, overfilled the pan so we had to trim the bottoms of each of the train cars to make them stand up flat. I had enough batter left for half a dozen normal cupcakes, though had I not over-done the train I would have had nearly a dozen.

Also, for this cake I used a regular boxed Pillsbury cake mix, but I think the pan would work really well with a heavier poundcake or bundt cake recipe. The normal cake is tasty, but the detail on the cars is lost. Then again, the details on the cars is lost as soon as I slather it with frosting :)

Wednesday, March 23, 2011

Chocolate Chip Ice Cream Cookie Cake

So this one is not my best work. The concept was good--two layers of chocolate chip cookie sandwiching vanilla ice cream. But I think some of the details need improvement.

I guess I should explain why I am making a chocolate chip ice cream cookie cake at all. This is what I refer to as Cake Week in our house. My birthday, my son's birthday, and my mother's birthday all fall within a 5-day span. Add in the sandwiching weekends and the assorted cake-eating occasions (celebrate with my in-laws, celebrate with just the immediate family, celebrate with my extended family, celebrate with the preschool, celebrate with the non-preschool kid friends), I get caked-out.

My attempt at a cookie cake was (is) for the immediate family. The end result was extremely tasty, and it looked nice, but it had a few flaws.  Here is what I did:

Ingredients
  • 1 recipe Nestle Toll House chocolate chip cookie dough. Yes, the one from the package.*
  • ~1 pint vanilla ice cream (you could use more, but I had less on hand than I expected).
  • Decorating frosting
Directions
  1. Mix cookie dough according to the recipe.
  2. Spread in two greased, 9" cake pans and bake at 375 for about 20 minutes, until the center is done.
  3. Cool the cookies in the pans for about 10 minutes, then remove from the pans.  Cool completely.
  4. Freeze the cookies for an hour or two before filling.
  5. Soften the ice cream in the microwave on about 45-second bursts at low power until it is spreadable.
  6. Spread softened ice cream on top of one cookie, then top with the other.**
  7. Freeze stacked cake until firm, then decorate.***
Where I went wrong:
* I love the regular, boring, tried-and-true Nestle recipe, but I should have remembered that the cookies tend to crisp up when they cool.  Crisp cookies are hard to slice. Crisp, frozen cookies are nearly impossible to slice. Even with a sharp chef's knife.  If I do this again, I think I'd look for a more cakey recipe that is soft when cool.  Probably one without the real butter, which makes it tasty but crunchy.

** My second mistake was I should have topped one cookie with softened ice cream, then put it back in the freezer to firm up before topping with the other cookie.  Even pre-chilled, my cookie layers worked like slabs of styrofoam and kept the icecream filling from freezing up firm.

*** This is not so much an error as something I feel compelled to explain. I love to bake, and I decorate cakes and cookies. But I'm not really into the decorating thing. I spend more energy on the taste and preparation of the finished product than on the looks. Part of me just doesn't have the patience for all the detail work, and part of me really prefers to make food that is NOT too pretty to eat. I want my food consumed, not left un-cut on the buffet table. And my decorating style (which this time included store-bought cake candies and chocolate frosting leftover from the preschool cupcakes) totally reflects it :)

Saturday, February 26, 2011

Baked Chocolate Donuts

Ingredients
  • 7/8 cup unbleached flour (1 cup minus 2 tablespoons)
  • 1/2 cup sugar
  • 1/4 cup cocoa powder
  • 1 tsp baking powder
  • 1 tsp instant coffee
  • 2 large eggs
  • 3 Tbsp vegetable oil
  • 2 Tbsp milk
Directions
  1. Heat oven to 375. Grease a donut pan.
  2. Whisk dry ingredients in one bowl.
  3. Beat eggs together in another bowl. Whisk in oil and milk
  4. Blend wet ingredients into dry. The batter is thick, somewhere between muffin and cookie dough.
  5. Spread evenly in donut pan. (I got 10 out of 12 openings filled but I didn't try to re-distribute the batter.)
  6. Bake 12-15 minutes or until a toothpick inserted in the center comes out clean. Serve glazed, dipped in butter and powdered sugar, or plain.
Basic Cocoa Glaze
Mix 1 cup powdered sugar, 2 Tbsp cocoa powder, and about 2 Tbsp milk until smooth. Drizzle over donuts or pour into a shallow bowl and dip the tops of the donuts.

Thursday, February 24, 2011

Triple Chocolate Pancakes

Pancakes are good for more than just breakfast. Like dinner. And dessert. And they are extremely easy to make as a variation on my basic pancake recipe.

This is also a great way to sneak in extra fiber into your diet. Just replace 1/2 of the regular flour with whole wheat. With all that chocolaty yumminess, you'll never notice :)

Ingredients:

  • 1 cup all-purpose flour (or 1/2 cup all purpose + 1/2 cup whole wheat flour)
  • 1/4 cup cocoa powder 
  • 3 Tbsp sugar
  • 2 tsp baking powder
  • 1/4 tsp salt
  • 1 egg
  • 1 cup milk
  • 2 Tbsp butter, melted and cooled
  • Chocolate and white chocolate chips
Directions:
  1. Heat a griddle or skillet. For an electric griddle, follow the instructions. I set mine to 325, or a skillet to medium heat. 
  2. In a large mixing bowl, combine all of the dry ingredients (not including the chocolate chips) with a whisk and set aside.
  3. In a second bowl, whisk all of the wet ingredients together, making sure to disperse the egg. The liquid should be pale yellow
  4. Add the liquid to the dry ingredients and stir with  a spatula until the batter just comes together. There will be lumps, but they shouldn't be huge. 
  5. Pour batter onto your hot griddle/pan.
  6. Before the top sets, sprinkle chocolate chips onto the cooking pancakes. 
  7. Cook until the top side looks almost dry. Then flip with a spatula and cook until the other side is a light golden brown.
Makes:
About 8 4-6" pancakes. Serve with whipped cream, chocolate sauce, warmed raspberry jelly, or just a fork.

Sunday, February 13, 2011

Birthday Cake - German Chocolate Cake


My husband's birthday cake request every year is German Chocolate.

Honestly, I used to have German Chocolate cake. Canned frosting that was oddly textured. Having made it now several times with fresh ingredients, I can honestly say that it is growing on me.


Ok, so I still cheat on the cake and use a mix for the cake. But boxed cake mix usually turns out quite nice. And yes, I made a heart-shaped cake. My husband is a Valentine's baby. I bought a heart-shaped cake pan years ago, and it gets plenty of use.

Not everyone in the family is in love with the coconut pecan frosting that differentiates this cake from every other chocolate cake, so I made sure to start with the best chocolate frosting and serve the coconut-pecan on the side.

For the coconut-pecan frosting, I use the recipe from the America's Test Kitchen Family Cookbook. To ice the cake, I made Bunny Frosting.

Bunny Frosting


Ingredients
  • 8 oz dark chocolate Easter bunnies. (A pair of formerly 6-oz bunnies, now headless, is slightly more than enough)
  • 1 cup heavy cream
  • 1 tsp vanilla extract

Directions

1. Chop the chocolate into small pieces and place in a large heat-proof mixing bowl.
2. In a separate heat-proof mixing bowl or measuring cup, microwave the cream until hot, about 1.5 minutes (I use the "beverage" button).
3. Add extract to hot cream then pour hot cream over the chopped chocolate
4. Whisk until all the chocolate is melted. It should look like shiny brown fudgy syrup at this point.


Frosting options:
  1. Pour warm ganache over cake
  2. Cool ganache until it is thick and spread like normal frosting
  3. Whisk with an electric mixer until fluffy and then ice
  4. Skip the cake and eat plain or use as a fudge sauce for ice cream or other desserts

Sunday, February 6, 2011

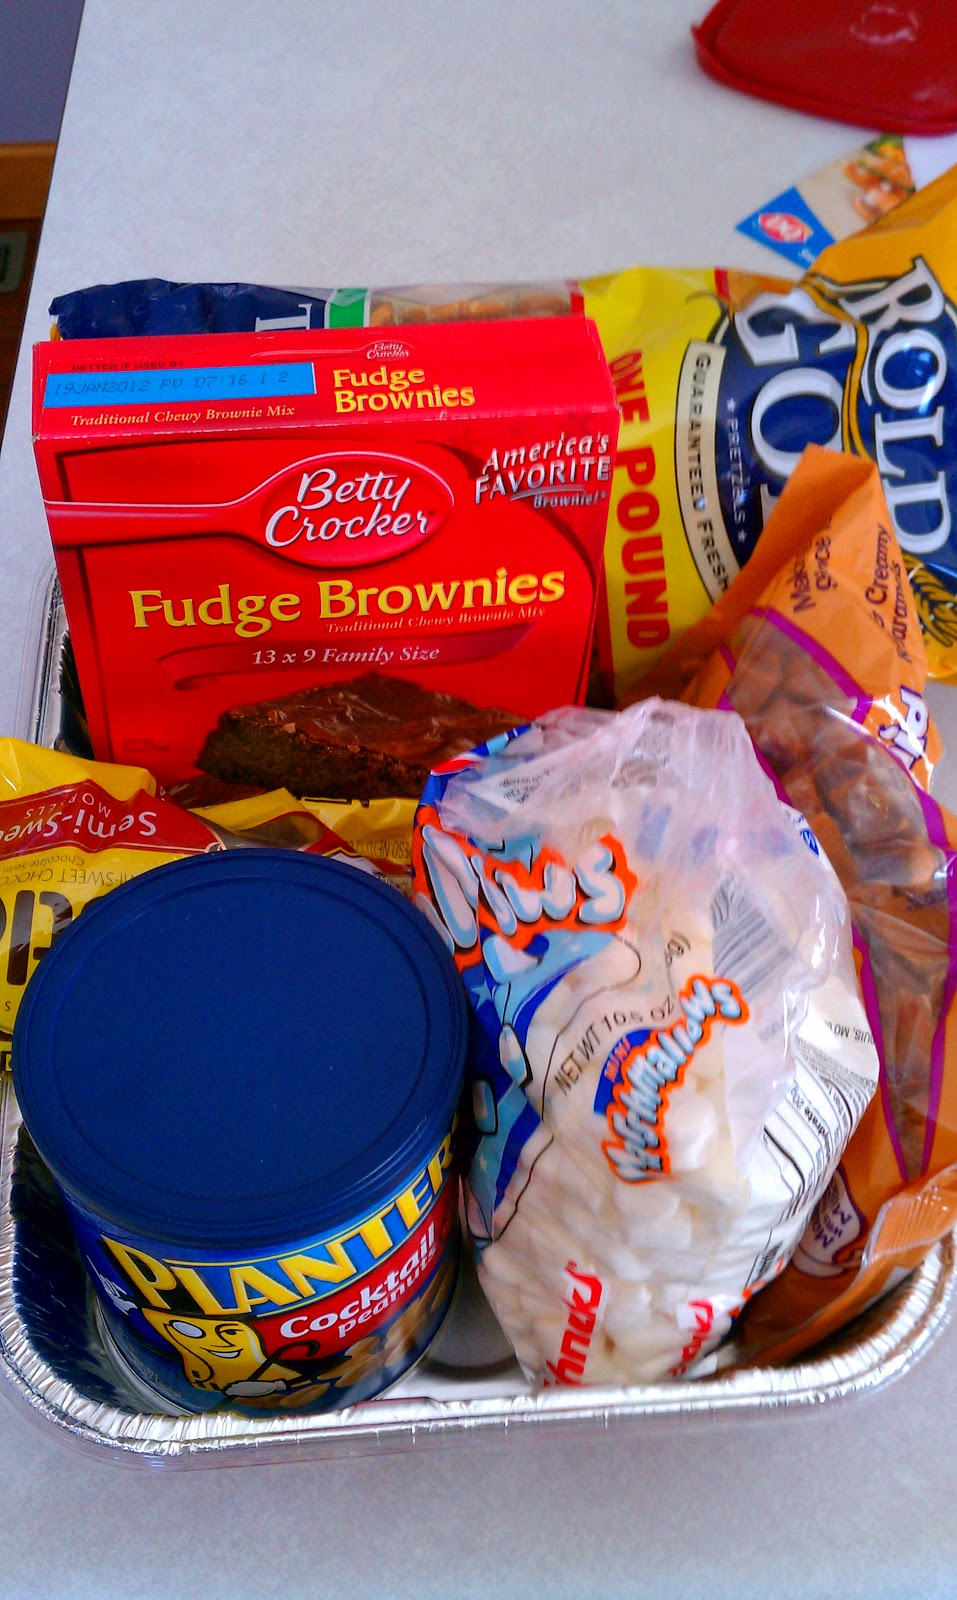
Potluck Food Part 2: Caramel Brownies

I love recipes, and my local grocery store, Schnucks, gives them away for free. These are beautiful full color recipe cards pre-punched to fit in their binders (you buy the binder) with a shopping list on the front.  They also frequently have someone on hand with samples.  Its a great marketing tactic, and more than once I've picked up a sample, picked up a card, and gone walking through the store with my shopping list at hand.

In fact, I did so Saturday. Along with my cheesy potato casserole, I decided to make a dessert for the not-a Superbowl-party-potluck. There can never be too many desserts. And today's sample recipe included Caramel Brownie Bars.  Yum. I had to upsize the recipe a bit (the original made an 8x8 pan, and that's just cruel at a large party)

Ingredients:
  • 1 9x13" pan-sized fudge brownie mix, plus eggs & oil (See box for directions)
  • 1 bag caramel candies (about 11 ounces)
  • 1 1/2 cup cocktail peanuts, coarsely chopped.
  • 1 1/2 cup mini pretzels, coarsely broken (put in a ziplock bag and hand to a preschooler...)
  • 1 cup mini marshmallows
  • 8 ounces chocolate chips
Directions:
  1. Bake brownies in a 9x13 pan according to package directions.
  2. Set brownies aside to cool. In a microwave-safe bowl, warm the (unwrapped) caramels with about 2 Tbsp of water in 30 second intervals, stirring, until you have a nice pourable caramel sauce.
  3. Spread about half of the caramel over the brownies.
  4. Onto the sticky caramel, sprinkle the nuts, the pretzels and the mini marshmallows.
  5. You can either melt the chocolate chips down and drizzle the chocolate over the rest of the candy pieces, or else just sprinkle the chips whole. If your brownies are still hot, then the chips will melt anyway :)
  6. Drizzle the rest of your caramel sauce on top.
No, these are not light. Or sugar free. Or low fat. Or anything like that. They are also darned sticky, so have a firm (not plastic) knife on hand to cut them, and plenty of wet wipes to clean up afterwards.

Tuesday, February 1, 2011

Blizzard Food: Whole Wheat Chocolate Chip Pancakes

2011 so far is all about snow days. We are supposedly in the middle of a blizzard today, but so far all we've had is 24 hours of freezing rain and sleet. I think I'd prefer the powdery stuff instead.

Still, it makes for good opportunities for big family breakfasts. Today, my 3-year old requested chocolate pancakes. Yes, I take his suggestions. Frequently. Helps that the kid and I have similar taste buds in breakfast food.

This one is a variation of my basic pancake recipe.

Substitute 1/2 whole wheat flour for the all-purpose flour in the recipe (for one batch, that's 1/2 cup whole wheat, 1/2 cup all-purpose).

Pour batter onto your frying pan or griddle, and sprinkle the chocolate chips onto the cooking pancakes. Don't try to add them to the batter ahead of time or they all sink to the bottom and only your last pancake has any chips.

It's also a good idea to gently tap down the chocolate chips into the cooking batter and don't let them sit on top of the pancake. Otherwise, when you flip them, the chocolate will melt all over the griddle.

If you want to get fancy, serve these with sweetened whipped cream (done by hand or from a can) and chocolate syrup, or with a fruit syrup.